C++ Compilation Process
Using g++ to understand the C++ compilation process
Understanding the C++ compilation process demystified important concepts for me early on - concepts such as preprocessing, intermediate representation, optimisation, assemblers, and the linker (static and dynamic). It also helped me with debugging across various languages and environments.
Compilers are divided into frontends and backends. Frontends are language-specific, and they generate an intermediate representation of source code. This intermediate representation allows backends to be shared across multiple languages. We'll explore both frontend and backend in detail.
g++ is the frontend we'll be using. g++ will pipe its intermediate representation to the appropriate backend components from the GNU Compiler Collection (GCC).
Example Files
We'll use many small code examples to understand the compilation process, but we'll keep coming back to these three example files:
header.hpp#ifndef HEADER_HPP
#define HEADER_HPP
#define MAX_VALUE 100
int add(int a, int b);
#endif // HEADER_HPP#include "header.hpp"
int add(int a, int b) {
int sum = a + b;
if (sum > MAX_VALUE) {
return MAX_VALUE;
}
return sum;
}#include "header.hpp"
int main() {
int result = add(2, 3);
return 0;
}To compile our pointless program into a single executable file, we pass our .cpp filenames as arguments to g++:
g++ main.cpp source.cpp -o my_programThe -o flag allows us to name our executable output. If this isn't provided, the default name is a.out.
When we run this command, each of the source files listed, in our case main.cpp and source.cpp, are treated as separate translation units. Until the backend phases, each translation unit is processed independently.
C++ has 9 translation phases, though some compiler implementations combine these. We'll separate these further into frontend and backend.
Frontend
Phase 1 - Mapping Source Characters
First, any operating system-specific end-of-line characters in our source code, such as \r\n (CRLF) on Windows, are replaced by the newline escape sequence \n. This standardisation prevents compatibility issues that would otherwise arise on different operating systems.
Then, the bytes representing our individual characters are mapped to the "basic source character set" of the compiler. Any characters in our code that cannot be mapped to the basic source character set are replaced with their universal character names (UCNs) or handled in some implementation-defined manner. For example:
std::cout << "Hello, 世界!"; // "世界" cannot be mappedThe above code becomes:
std::cout << "Hello, \u4e16\u754c!"; // Universal character namesBy converting characters to universal character names, the compiler can treat them as abstract entities and perform various operations on them without worrying about their specific encoding.
C++ compilers guarantee that UTF-8 characters can be mapped to their corresponding universal character names. Support beyond this, such as handling all potential Unicode universal character names, is compiler-specific.
We now consider our characters translation characters.
Phase 2 - Splicing Lines
In this phase, if the first translation character is the "byte-order mark" (special Unicode character code U+FEFF), it is removed. This character is typically used as the first character to indicate to software that the file is encoded with big-endian UTF-16. It isn't needed in compilation.
Next, if any lines of code end with a backslach (\) followed by 0 or more whitespaces and then the newline character \n, the combination of characters is deleted, combining two lines of source code into one logical line. Let's look at two situations - one where this is not a problem, and one where it is.
I temporarily modified our main.cpp file to have a backslash character followed by a space at the end of the line where our add function is called:
#include "header.hpp"
int main() {
  int result = add(2, 3);\
  return 0;
}
When we compile again, the executable compiles successfully, but we get this warning:
main.cpp:6:26: warning: backslash and newline separated by space
    6 |   int result = add(2, 3);\
      |
In this case line-splicing would not be a problem, as the single logical line would be:
int result = add(2, 3);return 0;However, take a look at the following version of main.cpp. I've added a comment that ends in a backslash and a space. Below it, I've defined a new integer variable a that is passed as the first argument to the add function.
#include "header.hpp"
int main() {
  // this comment ends with a backslash and space for some reason\
  int a = 6;
  int result = add(a, 3);
  return 0;
}
Here, the backslach, space, and newline character at the end of the comment would be deleted during line-splicing, making int a = 6; part of the comment, so when we try to compile:
main.cpp: In function ‘int main()’:
main.cpp:8:20: error: ‘a’ was not declared in this scope
    8 |   int result = add(a, 3);
      |
This is why the compiler warns us when a backslash and a newline are separated by a space. When a line ends with a backslash but no space, most IDEs syntax-highlight the next line as a comment:
// like this\
int a = 6;
Finally, a newline character is added to the end of the translation unit (if the corresponding .cpp file isn't empty and doesn't already end with the newline character). This makes sure that all translation units and header files are terminated correctly and are not combined in unexpected ways.
Phase 3 - Lexing
Before preprocessing, lexing splits our source code into "preprocessing tokens" and whitespace:
int sum = a + b ;
// --- token types --- //
int // keyword (identifier)
sum // identifier
= // operator
a // identifier
+ // operator
b // identifier
; // punctuator
These tokens are the smallest elements in phases 3, 4, 5, and 6. Whitespace separates tokens but is not a token in and of itself.
Here's what a preprocessing token class might look like in the lexer code:
class PreprocessingToken {
public:
    enum Type {
        IDENTIFIER,
        KEYWORD,
        NUMBER,
        STRING,
        PUNCTUATION,
        OPERATOR,
        DIRECTIVE
    };

    PreprocessingToken(Type type, std::string value) : type(type), value(value) {}

    Type getType() const { return type; }
    std::string getValue() const { return value; }

private:
    Type type;
    std::string value;
};
Notice here that the lexer for a C++ compiler is written in C++ itself - writing a compiler for a language in that same language is known as bootstrapping.
During lexing, comments are replaced by one space character.
Partial tokens will throw errors, for example:
// partial string literal token (no closing quotes) will throw an error
 "Hello, world
Phase 4 - The Preprocessor
The preprocessor iterates through the preprocessing tokens, identifying and processing all preprocessor directives, which begin with #. In our case these are the #include, #define, #ifdef, and #ifndef directives.
The -E flag in g++ lets you view the output of the preprocessor without actually compiling, assembling, or linking.
# view the preprocessor output in the terminal
g++ -E main.cpp source.cpp
# save the preprocessor output to a .i file
g++ -E main.cpp source.cpp > output.i
# 0 "main.cpp"
# 0 "<built-in>"
# 0 "<command-line>"
# 1 "/usr/include/stdc-predef.h" 1 3 4
# 0 "<command-line>" 2
# 1 "main.cpp"
# 1 "header.hpp" 1
int add(int a, int b);
# 2 "main.cpp" 2
int main() {
int result = add(2, 3);
return 0;
}
# 0 "source.cpp"
# 0 "<built-in>"
# 0 "<command-line>"
# 1 "/usr/include/stdc-predef.h" 1 3 4
# 0 "<command-line>" 2
# 1 "source.cpp"
# 1 "header.hpp" 1
int add(int a, int b);
# 2 "source.cpp" 2
int add(int a, int b) {
int sum = a + b;
if (sum > 100) {
return 100;
}
return sum;
}Let's look at the format of this output first. Lines beginning with a # are called linemarkers, and their format is # linenumber filename flags. They indicate that the line that follows them comes from filename at linenumber.
For example, above, we can see that int main(){ follows the linemarker # 2 "main.cpp" 2. This means int main(){ comes from the file main.cpp on line 2. The second number 2 in this line is a flag that means we're returning from another file. In this case, we're returning from processing int add(int a, int b);, which is line 1 of header.hpp.
There are four flags for linemarkers:
1 - Indicates the start of a new file
2 - Indicates returning to a file after processing an included file
3 - Indicates following lines come from a system header file and so certain warnings should be surpressed
4 - Indicates following lines should be treated as being wrapped in an "extern" block, meaning the declarations are defined in other files
The empty lines are where our conditional preprocessor directives or original empty lines were.
The information in these linemarkers allow precise debugging during compilation. If we want to view the preprocessor output without the linemarkers and empty lines to focus on the code at this point, we can use the -P flag after the -E flag.
g++ -P -E main.cpp source.cpp > output.iint add(int a, int b);
int main() {
int result = add(2, 3);
return 0;
}
int add(int a, int b);
int add(int a, int b) {
int sum = a + b;
if (sum > 100) {
return 100;
}
return sum;
}The preprocessor has replaced the #include "header.hpp" directives in both main.cpp and source.cpp with the actual code from header.hpp. This means the code from header.hpp appears twice. We did use a header guard in header.hpp to avoid duplicate headers:
#ifndef HEADER_HPP
#define HEADER_HPP
// ...
#endif // HEADER_HPP
Remember, though, that until linking, each translation unit is processed separately, so header guards only work within a translation unit. This is important to know, because though our duplicate prototype int add(int a, int b); didn't cause problems, duplicate definitions would. If we move the actual definition of the add function from source.cpp into header.hpp...
/usr/bin/ld: /tmp/ccqAOIDU.o: in function `add(int, int)':
source.cpp:(.text+0x0): multiple definition of `add(int, int)'; /tmp/ccToyIgD.o:main.cpp:(.text+0x0): first defined here
collect2: error: ld returned 1 exit status
This is an error thrown by the linker /usr/bin/ld, so we'll talk about this in detail in the linker section.
The preprocessor has also replaced both occurences of the macro MAX_VALUE in source.cpp with 100 thanks to #define MAX_VALUE 100 in header.hpp.
The code from header.hpp goes through phases 1 to 4 itself before being included. This happens recursively, so that if our header.hpp file had its own #include "innerheader.hpp" directive, innerheader.hpp would go through phases 1 - 4 before being included in header.hpp.
Phase 5 - Determining Common String Literal Encodings
Our example source code from phase 1 contained the actual Unicode codepoints U+4E16 and U+754C for the Unicode characters "世" and "界", respectively. Unicode codepoints are unique numerical values that identify a specific character in the Unicode character set.
Phase 1 converted these Unicode codepoints to their universal character names, \u4e16 and \u754c, for preprocessing.
Here in phase 5, universal character names in character literals and non-raw string literals are converted back to the actual unicode codepoints U+4E16 and U+754C. This is often called "expansion".
The Unicode codepoints are then encoded into the target character encoding - this is the encoding that will be used for storing or processing the character and string literals in our compiled program. For example, if we're using UTF-8, U+4E16 is converted to the UTF-8 byte sequence E4 B8 96.
If a character cannot be encoded, the result will be specific to the compiler, but it is guarunteed not to be null.
Phase 6 - Concatenating String Literals
In this phase, adjacent string literals are concatenated. Because of this, the following code will compile successfully, without any operator between the two strings:
#include <iostream>
int main(){
        //   becomes "Hello g++!"
        std::cout << "Hello" " g++!" << std::endl;
}
Phase 7 - Compiler
In this phase, the compiler performs lexical, syntax, and semantic analysis on the preprocessed source code. Let's look into each.
Lexical Analysis (lexing)
The preprocessing tokens the compiler has processed thus far are now converted to compiler tokens. These tokens are more specific than preprocessing tokens. For instance, if is an "identifier" preprocessing token, but here it's an "if" compiler token. Each preprocessing token becomes a compiler token - there's no re-tokenising.
Syntax Analysis (parsing)
Two data structures are built during parsing.
The first is the parse tree.
As the parser reads the stream of tokens generated by the lexical analyzer, it attempts to match them against the C++ grammar rules. When a grammar rule is successfully matched, the corresponding parse tree nodes are created. If a syntax error is encountered during this process, the parser reports the error. In this way, the syntax is checked as the parse tree is being built, and the parse tree is a one-to-one mapping of the grammar to a tree data structure.
Here's what a section of a parse tree for a very simple statement might look like:
(a + b) * c;
( a + b ) * c ;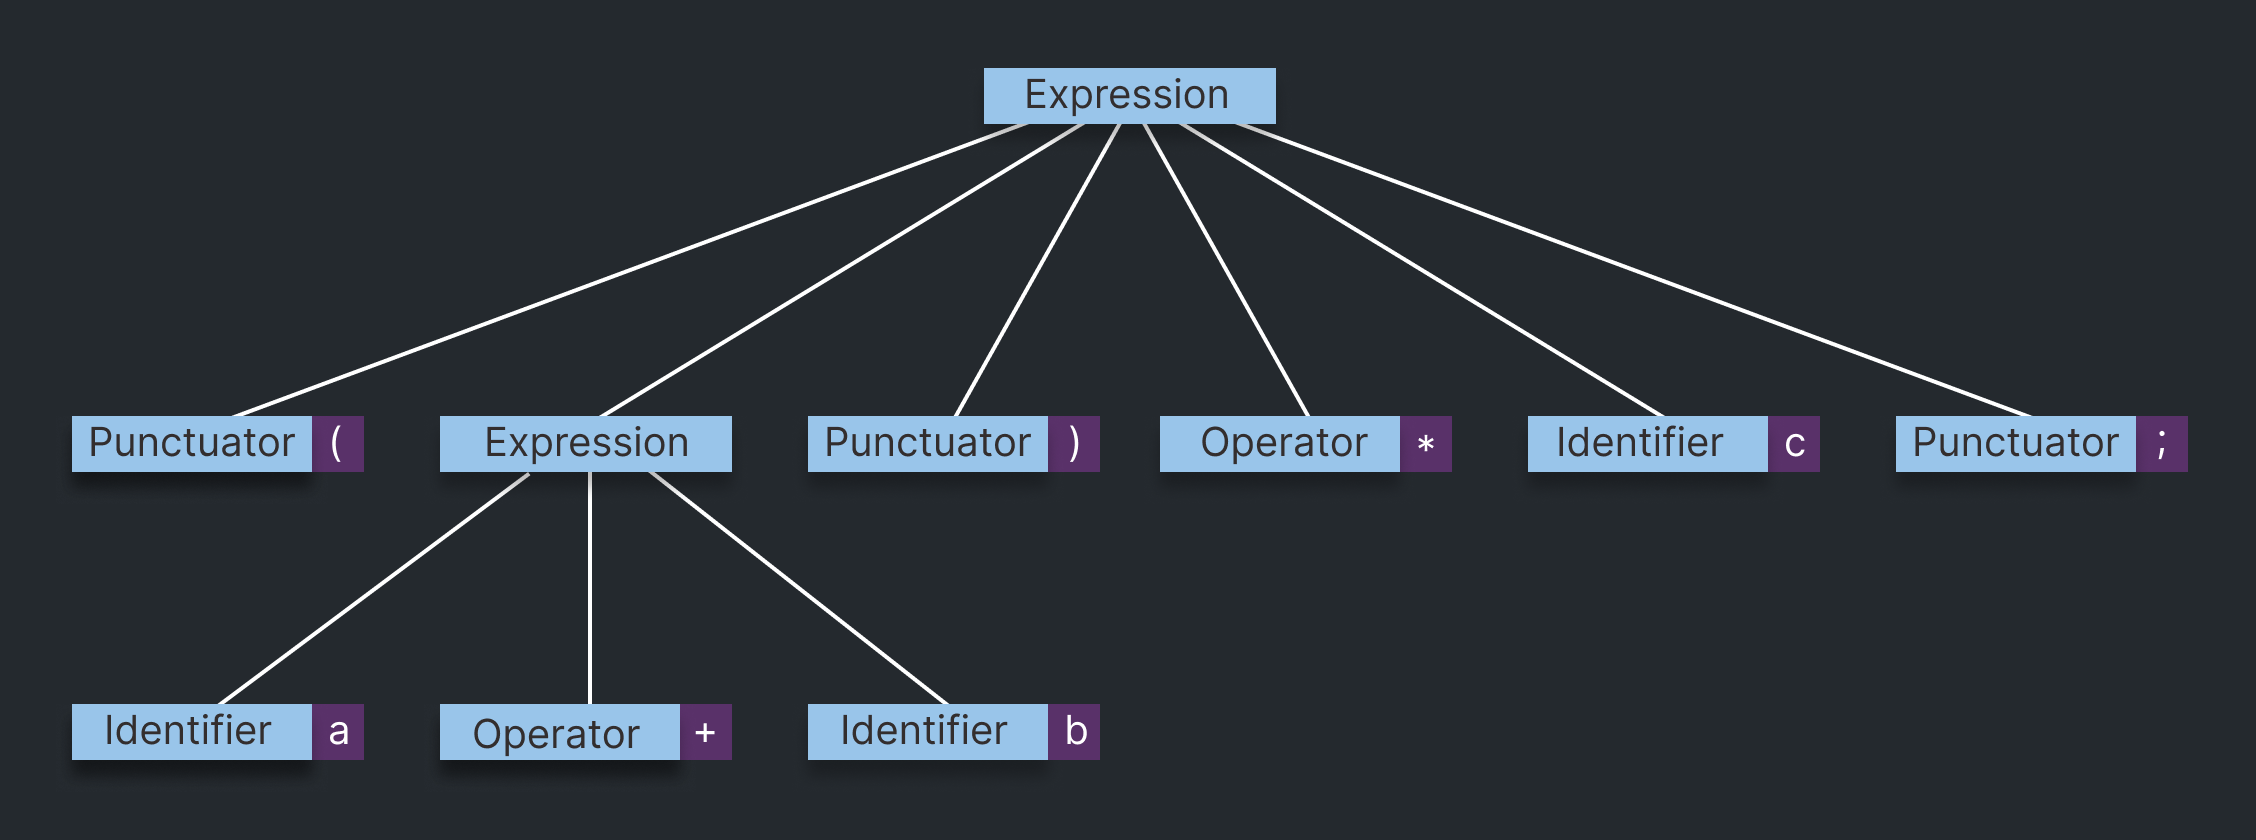
An abstract syntax tree (AST) is then built, typically by traversing the parse tree.
📝 Note here that many modern compilers skip creating an explicit parse tree and build the AST directly during parsing for efficiency.
This AST is a more simplified representation than the parse tree. It omits a lot of syntax because the associations the syntax represents are derivable from the structure of the tree itself. For example, the parenthesis we used for order of operations (to perform addition before multiplication) do not need to become parenthesis nodes in the AST - the addition will be evaluated first because the addition node is a child of the multiplication node.
Below is what the corresponding section of an abstract syntax tree might look like:
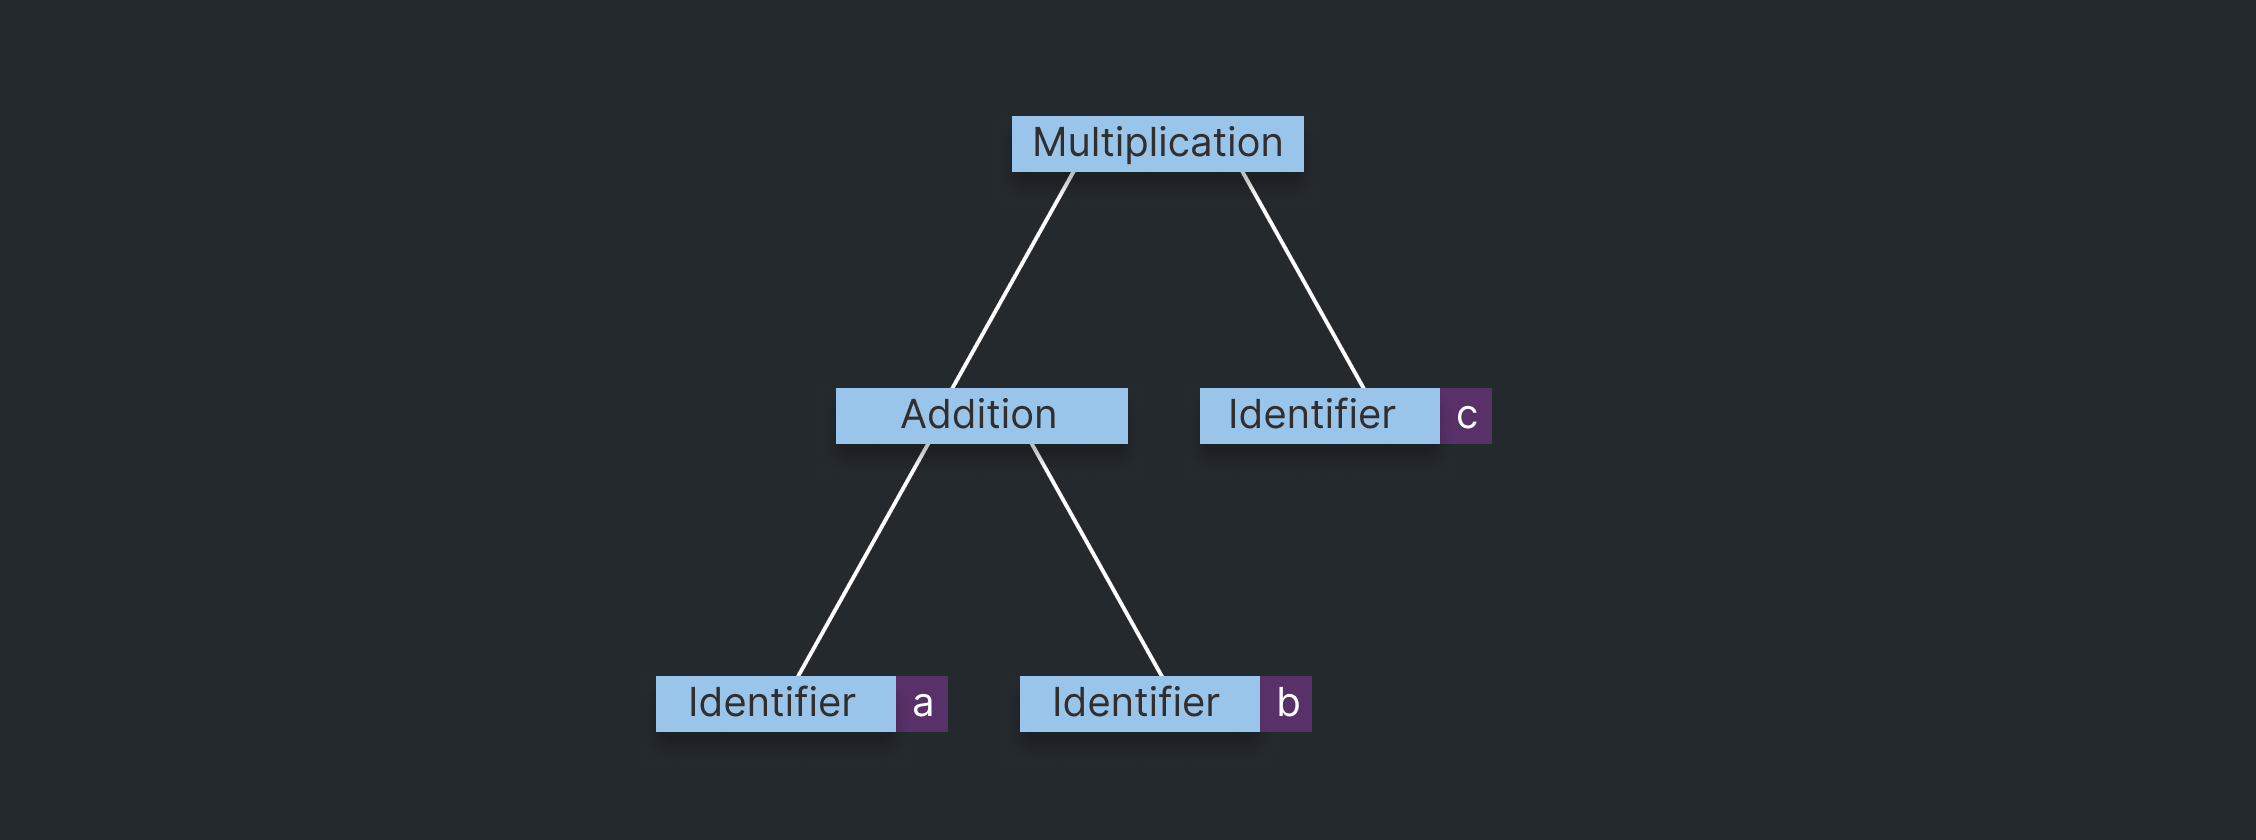
Nodes follow an inheritance hierarchy. Some other broad node types commonly found in C++ compiler ASTs are:
- Declartion Nodes for functions, variables, classes and namespaces
- Statement Nodes for if, for, while, and return statements
- Expression Nodes for binary operations, unary operations, and function calls
- Type Nodes for built-in types, structs, and class types
- Template Nodes for class and function template declarations (we'll discuss these more in Instantiating Templates)
While the parse tree is more detailed, the simplified abstract syntax tree is used for subsequent phases, like semantic analysis (explored in the following section). The abstract syntax tree is an example of a high level intermediate representation, but it's still language-specific, and therefore not quite the intermediate representation we'll be passing to the backend compiler components.
Semantic Analysis
The abstract syntax tree built during parsing is traversed and several operations take place.
Symbol Table Construction
A symbol table is constructed. The symbol table contains information about identifiers in the program, including variables, functions, and types. It stores details such as the name, type, scope, and memory location of each identifier. This symbol table is used for type checking, scope resolution, and ensuring the correct usage of identifiers in the program.
Type Checking
The compiler verifies that operations, such as assignments, arithmetic expressions, and function calls, are performed between compatible types. It also checks that function calls are given the expected number and types of arguments, and that functions with non-void return types have the appropriate return statements.
Scope Resolution
The compiler tracks the scope of identifiers (variables, functions, etc.) to ensure they are used within their defined boundaries. This prevents errors like using a variable before it's declared or accessing a variable outside its scope.
Control Flow Analysis
The compiler analyzes the control flow of the program to identify and remove unreachable code.
Here, at the end of phase 7, the language-specific AST for each translation unit is traversed and a GENERIC tree is generated for each individual function in the translation unit. The GENERIC tree is the first language-independent intermediate representation we've seen so far, but it's still not quite the intermediate representation we'll be passing to the backend. From this point on, the function is main unit of compilation, rather than the entire translation unit.
📝 As an optimization, many frontends convert directly from AST to GIMPLE (which we'll discuss soon), bypassing explicit GENERIC creation. Either way, GENERIC-compatible tree structures are used internally during this process, and this is when template instantiation happens.
Phase 8 - Instantiating Templates
Templates in this context are blueprints for creating generic functions or classes that work with any data type. In source code they look like this:
template <typename T>
T add(T a, T b) {
  return a + b;
}
When the compiler traversed the AST, it identified these templates and the types they're used with. In this phase, it generates concrete functions for those types. This is called instantiating templates. For the example above, add templates may be instantiated for int and double. These are instantiation units.
Next comes gimplification. This is the process of converting GENERIC trees (or GENERIC-compatible structures) into the GIMPLE language.
If you're interested in seeing the open source GCC code for gimplifying, you can find gimplify.cc here.
Backend
Intermediate Representation (GIMPLE)
We can save the GIMPLE passed to the backend as .gimple files in our current directory:
g++ -fdump-tree-gimple main.cpp source.cpp -o myprogramThis command still compiles our program, so I've passed a name with the -o flag. The -g runs the command with debugging.
int main ()
{
  int D.2352;

  {
    int result;

    result = add (2, 3);
    D.2352 = 0;
    return D.2352;
  }
  D.2352 = 0;
  return D.2352;
}int add (int a, int b)
{
int D.2356;
int sum;
sum = a + b;
if (sum > 100) goto <D.2354>; else goto <D.2355>;
<D.2354>:
D.2356 = 100;
// predicted unlikely by early return (on trees) predictor.
return D.2356;
<D.2355>:
D.2356 = sum;
return D.2356;
}As code is now in GIMPLE intermediate representation, it can be optimised in the same way regardless of which language the source code was written in.
GIMPLE is an ideal format for certain optimisations as it sits between the AST and the next, lower-level representation, RTL (Register Transfer Language). No single AST is shared by all compiler frontends, so every language would need to have it's own AST optimisations. RTL is shared by frontends, and is good at optimisations close to the metal, such as register allocation. However, RTL loses a lot of high level information, such as datatypes and array references, which makes higher level optimisations difficult.
GIMPLE is structurally simpler than the AST, can be shared across frontends, and retains the high level information lost in RTL.
Many optimisations may happen here, but some examples are:
- Constant Propogation and Folding - Where possible, variables are replaced with their constant values, and constant expressions are evaluated at compile time, removing the need for evaluation at runtime
- Dead Code Elimination - Code that has no effect on the program's output is removed
- Loop Invariant Code Motion - Unchanging variables inside of loops are moved outside of the loop
Lowered GIMPLE
A component sometimes called a lineariser translates GIMPLE into "lowered GIMPLE". This involves breaking down complex constructs into simpler, more primitive operations that are closer to assembly code.
We can output .lower files with g++.
g++ -fdump-tree-lower main.cpp source.cpp -o myprogramLet's look at .lower file for main.cpp.
int main ()
{
  int result;
  int D.2352;

  result = add (2, 3);
  D.2352 = 0;
  goto <D.2353>;
  D.2352 = 0;
  goto <D.2353>;
  <D.2353>:
  return D.2352;
}
By reducing everything to basic operations (like simple arithmetic, direct memory access, and straightforward control flow), the code becomes easier for the compiler to analyze and to further optimise at this stage. It also makes the next step, which is generating a Control Flow Graph, simpler.
Control Flow Graph (CFG)
The lowered GIMPLE is used to create a Control Flow Graph (CFG) - a graph representation of all paths that might be traversed through a program during its execution. Each node in the CFG represents a basic block, and edges represent the flow of control from one block to another.
A basic block is a sequence of instructions executed one after the other, without any interruption or branching in the middle of the block.
Again, if you're interested in seeing the actual open-source GCC code responsible for control flow functions, you can find tree-cfg.cc here.
g++ allows you to save its intermediate representations from different stages of compilation to .dot files. These contain a graph description language called DOT developed by the Graphviz project.
We can output .dot files with:
g++ -fdump-tree-all-graph -g main.cpp source.cpp -o myprogramOur directory will now contain a lot more files, including .dot files:
myprogram-source.cpp.005t.original
myprogram-source.cpp.006t.gimple
myprogram-source.cpp.009t.omplower
myprogram-source.cpp.010t.lower
myprogram-source.cpp.012t.ehopt
myprogram-source.cpp.013t.eh
myprogram-source.cpp.015t.cfg
myprogram-source.cpp.015t.cfg.dot
...
As you can see, some .dot files have "cfg" in their titles.
We can download graphviz for Linux and convert the .dot files to a png:
sudo apt-get update
sudo apt-get install graphviz
dot -Tpng myprogram-source.cpp.015t.cfg.dot > source_cfg.png
We can see above that the compiler has identified that that the true branch of if(sum > 100) is unlikely to run and return early because our inputs to add were hardcoded as 2 and 3.
After optimizations have been made based on the Control Flow Graph, GIMPLE is put through an RTL generator, which outputs Register Transfer Language.
Register Transfer Language (RTL)
Register transfer language is an intermediate representation in GCC that's very close to assembly language, but it's independent of any actual architecture.
In RTL, the addition inside our add function may look something like this:
(set (reg:SI 140)
     (plus:SI (reg:SI 138)
              (reg:SI 139)))
Here, the values of registers 138 and 139 (our 2 and 3) are being added, and the result is being stored in register 140.
The compiler then allocates registers, and a "pattern matcher" replaces suboptimal code patterns with more efficient equivalents, for example, multiplying by 2 may be replaced with a left shift.
//  9   <-- left shift <--   18
00001001                  00010010
The output of the pattern matcher is assembly language.
Assembly Language
We can save the assembly code that will be passed to the assembler to .s files with g++. Let's just look at a slice of assembly from main.s, as the .s files are quite a bit longer:
g++ -S main.cppThe -S flag is used to "Compile only; do not assemble or link".
        .file   "main.cpp"
        .text
        .globl  main
        .type   main, @function
main:
.LFB0:
        .cfi_startproc
        endbr64
        pushq   %rbp
        .cfi_def_cfa_offset 16
        .cfi_offset 6, -16
        movq    %rsp, %rbp
        .cfi_def_cfa_register 6
        subq    $16, %rsp
        movl    $3, %esi
        movl    $2, %edi
        call    _Z3addii@PLT
        movl    %eax, -4(%rbp)
        movl    $0, %eax
        leave
        .cfi_def_cfa 7, 8
        ret
        .cfi_endproc
.LFE0:
        .size   main, .-main
...
I've highlighted a few lines of interest in the assembly code above.
.globl main indicates our main function is global, and .type main, @function indicates it is a function.
movl $3, %esi, and movl $2, %edi load the values 3 and 2 into registers esi and edi, respectively. These registers are often used as the first two function arguments.
call _Z3addii@PLT is calling our add function. _Z gives our function a unique name in case other functions have the same name but different numbers / types of parameters. ii indicates two integer arguments, and @PLT indicates the call is made through the Procedural Linking Table (PLT), which resolves externally defined functions at runtime.
The assembly code is piped to the assembler.
Assembler
The assembler takes the assembly language as input and goes through several steps similar to that of a compiler.
Assembler Preprocessing
The assembler preprocesses the assembly code much like g++ did with our C++ source code, resolving preprocessing directives, expanding macros, and handling conditional assembly.
Assembler Symbol Table Creation
The assembler creates a symbol table which maps symbolic names (like labels and variables) to their corresponding memory addresses.
We will look at the actual symbol tables for our examples in the section on static linking.
Assembly
The assembler translates the assembly instructions into their corresponding machine code instructions. This involves looking up the opcodes and operands for each instruction in the instruction set architecture (ISA) of the target CPU.
Object File Creation
The assembler generates an object file, typically with a .o extension, which contains the machine code instructions, the symbol table, and other metadata for each translation unit.
At this stage, our .o files have unresolved symbols in their symbol tables. This means that they still need to be linked to their actual implementations. These implementations could be in other .o files coming from our assembler, or in shared library files on the target system, such as in .dll (Dynamic Link Library) files on Windows, .so (Shared Object) files on Linux, and .dylib (Dynamic Library) files on macOS.
It's the linker's job to link these unresolved symbols with their external implementations.
Phase 9 - Linking
The Static Linker
To better understand the linking process, we can tell g++ to output the .o files for each of our translation units without linking. This way we can have a look inside the .o files before passing them to the linker ourselves:
g++ -c main.cpp source.cppThe -c flag means "Compile and assemble, but do not link."
This command gives us these two files:
main.o
source.o
We can use a tool called objdump on Linux to look inside our source.o file. Objdump can show a lot of different information from a file - the -t flag just shows the file's symbol table(s):
objdump -t source.o SYMBOL TABLE:
0000000000000000 l df *ABS* 0000000000000000 source.cpp
0000000000000000 l d .text 0000000000000000 .text
0000000000000000 g F .text 000000000000002b _Z3addiiThe final entry in the symbol table from source.o is our add function. Because add is defined in this same file, the entry is complete before linking.
0000000000000000 indicates the offset of the add function into the .text section. g means this symbol is global, F means it's for a function. 000000000000002b is the address of the function.
Let's look at the symbol table in main.o:
objdump -t main.o SYMBOL TABLE:
0000000000000000 l df *ABS* 0000000000000000 main.cpp
0000000000000000 l d .text 0000000000000000 .text
0000000000000000 g F .text 0000000000000025 main
0000000000000000 *UND* 0000000000000000 _Z3addiiIn main.o, the symbol for our add function is undefined (*UND*), because linking hasn't happened yet.
The linker will resolve this undefined symbol when it sees the corresponding entry in the symbol table in source.o.
This is why when we try to compile main.cpp withouth passing in source.cpp, like this:
g++ main.cppWe get an error from the linker, /usr/bin/ld:
/usr/bin/ld: /tmp/ccKQGsdB.o: in function `main':
main.cpp:(.text+0x17): undefined reference to `add(int, int)'
collect2: error: ld returned 1 exit status
Before moving on to the dynamic linker, let's manually link main.o and source.o into an executable:
g++ main.o source.o -o myprogramThe Dynamic Linker
The dynamic linker resolves symbols in .o file symbol tables with shared (dynamic) libraries on the target system.
We can see which dynamic libraries are being brought into a final executable program on Linux with ldd, which prints shared object dependencies:
ldd myprogramlinux-vdso.so.1 (0x00007ffc2f5ed000)
libc.so.6 => /lib/x86_64-linux-gnu/libc.so.6 (0x00007fd406e6a000)
/lib64/ld-linux-x86-64.so.2 (0x00007fd4070a0000)We can see that libc.so is being brought in from the lib folder, as C++ uses functions from the standard C library.
I ended up writing a post about dynamic linking (coming soon) and how it relates to Vulkan, so I'll end here, and you can read that post for more on dynamic linking.
📝 Some define a middle-end as containing any components of a traditional backend that perform machine-independent optimizations on intermediate representations. They then define the backend as the components that are machine-specific, much like the frontend is language-specific.
Every compiler is different, but I've found that a general understanding of these C++ compilation phases is a great foundation.
That's it for now! Thank you for reading. I really hope it cleared up some concepts for you and provides a solid structure for further learning. 🩵🧠